Sum up of last week's intro to veggies.
Veggies for last week: avacado, asparagus, cauliflower, spinich, leeks, red peppers
I cooked up a family pack of chicken breast to use throughout the week, so it's all chicken this week
Monday, I made a quesadilla. I had sundried tomato wraps, cooked chicken, cheese, salsa, frozen spinich. Put together, and voila, dinner. It was pretty good and filling. I was surprised.
Tuesday, was big salad night. M even ate the leeks and red peppers and didn't complain about them. Yet more food off his list of things he doesn't like. I used the avacado to try to make a salad dressing out of it with Greek yogurt. I was not a fan. M liked it. So, not a total loss, but not a huge success either.
Wednesday, I tried to make a cauliflower mash to go with the chicken. I used a 2/3 block of cheddar, 1/4 cup parmasean and still we were not fans of the cauliflower. So, with all that cheese not making a bit of difference, cauliflower is on the list of Not Going to Touch It veggies. I had some tomatoes instead and M opted for peas. At least we still ate veggies.
Thursday, spinich and tomato grilled cheese.
Friday was a success. I was just trying to use up stuff. The last of the chicken, a couple open boxes of pasta, a red pepper, half a leek. Surprisingly, cook the pasta, heat the rest of the stuff in a pan with some garlic and oil, and it was mighty tasty. It even was said to be a make again meal. Woot! I also made parmasean roasted asparagus. I thought it was edible, but not much more. AJ was not a fan at all, and M thought it was great. So, I guess asparagus will go back on our grocery list again at some point.
I was so surprised I actually made, and ate, so many veggies and actual dinners last week. It was nice to get back to cooking and creating in the kitchen again.
Still need to get to work on the exercise portion of things.
Showing posts with label Recipes. Show all posts
Showing posts with label Recipes. Show all posts
Thursday, January 26, 2012

Friday, August 19, 2011
Banana muffins
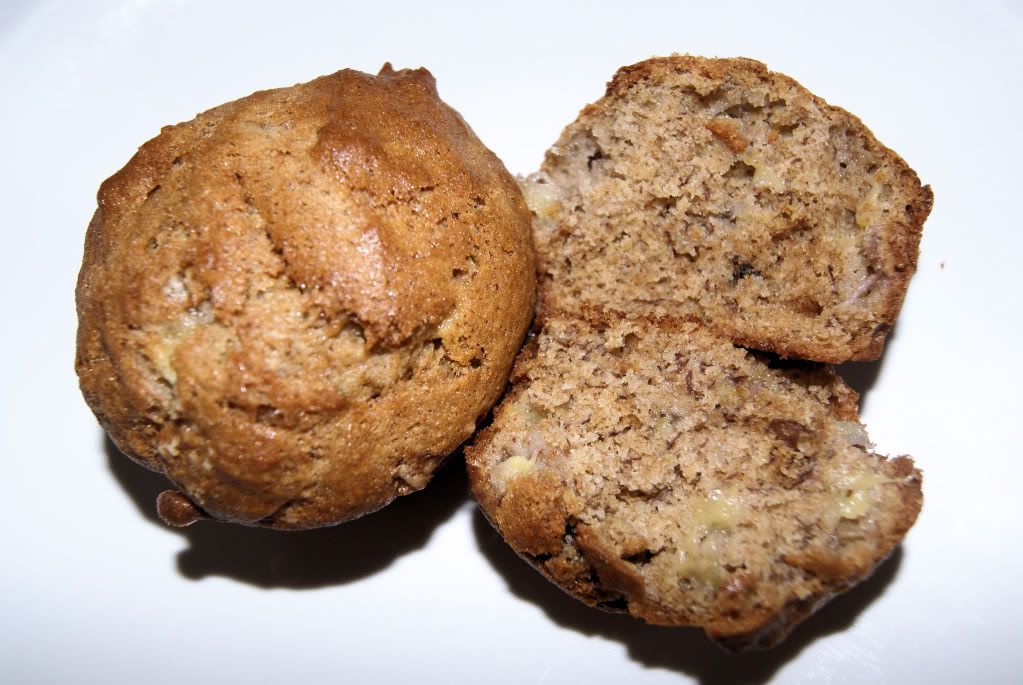
In my plan of baking I realize a huge error on my part, I have almost a cup of sugar and absolutely no butter in the house. Hmmm, well, that makes things interesting.
When my obvious recipes fail me, I go to allrecipes.com. There's always someone else there who had to alter a recipe to work with their ingredients or taste preferances. Thankfully, I found something I could work with. Sarah's Banana Bread Muffins
For the changes, I put in all four bananas, because, really, what am I going to do with one overripe banana? Also, has anyone eating a banana baked good ever complained that it was too banana-y? I'm getting a little tired of typing banana, and I have Gwen Stefani sining in my head now.
Ok, so all the fruit is in, since there is extra, I switch one cup of AP flour for whole wheat. Now it's a healthy baked good, which makes it better when I eat more. I also added some cinnamon. I like baking with cinamon, it makes me happy, and feels like fall, even when the house is 85 degrees.
The ones hot out of the oven tasted great. All soft muffin-y. This morning I had one straight off the counter, without heating, and it was a bit dry for my liking. Maybe it was the whole wheat flour, or maybe it was just telling me next time to buy more butter for smearing.
Monday, August 15, 2011
Cake Challenge
So, a few weeks ago I saw the Rainbow cake on Pinterest. It looked so cool, I knew I wanted to try it for AJ's birthday. Never mind that she doesn't really like cake. I just wanted to challenge myself. So, I took this:

And by the time I was finished with it, it looked like this:


The inside looked fantastic. It was a show stopper for all the guests, which was the whole point really. The kids loved all the colors and were fighting over which "flavor" was their favorite. Apparently blue tastes much better than orange. The adults were impressed and even commented about how I got the rainbow in order. Well of course, why bother if not to get the rainbow in order?
Now for the issues:
The cake batter was really easy to make. I divided the batter by spoonfuls rather than weight since I don't have a food scale. The coloring was fun, I finally broke out my cake decorating tackle box for the first time in a while.
The first issue came when trying to get the cake out of the pans. I didn't follow the directions in that I didn't have parchment paper to line the pan, just shortening and flour. The orange came out great, the green and yellow tore when trying to get them out. Second batch, I over prepped the pans, so the blue and purple came out easy, just needed to scrape the flour paste off the bottom. The red still stuck. Oh well, that's what frosting is for.
Now on to the frosting: I tried Martha's frosting listed in the recipe, a merenge buttercream. The first batch broke. The butter turned all grainy. I think the eggs were still too warm when the butter was added. I tried a second batch. This one looked fantastic, so this is where my mother (my assistant for the day), and I, took a break for lunch.
Sidenote: We found the most amazing Greek restaurant in my town. I want to get M there, since he has actually eaten real Greek food, you know, like from Greece, so he can be a judge.
Anywho... we get back and the fantastic looking batch of frosting is now soup. ARGH! Ok. Two batches gone, 14 eggs gone. Martha is no longer my hero. Time to try something else. We go back to a regular buttercream, tried and true. It's much sweeter than I had hoped for, but it worked.
The cake looked great when we were done. We did a texture design and it looked like a fluffy snowball. Super cute. Well, Sunday, party day, was about as humid as it can get without actually raining. I check the amazing cake, and half the frosting is sliding off the side. Fantabulous! Move it to the basement, since the fridge is full of party stuff, and hope for the best. I am so thankful for the texture technique, as it's so easy to fix.
In the end, the cake was a success. Thankfully the awesomness of the cake overrode the sweetness of the frosting.

And by the time I was finished with it, it looked like this:
The inside looked fantastic. It was a show stopper for all the guests, which was the whole point really. The kids loved all the colors and were fighting over which "flavor" was their favorite. Apparently blue tastes much better than orange. The adults were impressed and even commented about how I got the rainbow in order. Well of course, why bother if not to get the rainbow in order?
Now for the issues:
The cake batter was really easy to make. I divided the batter by spoonfuls rather than weight since I don't have a food scale. The coloring was fun, I finally broke out my cake decorating tackle box for the first time in a while.
The first issue came when trying to get the cake out of the pans. I didn't follow the directions in that I didn't have parchment paper to line the pan, just shortening and flour. The orange came out great, the green and yellow tore when trying to get them out. Second batch, I over prepped the pans, so the blue and purple came out easy, just needed to scrape the flour paste off the bottom. The red still stuck. Oh well, that's what frosting is for.
Now on to the frosting: I tried Martha's frosting listed in the recipe, a merenge buttercream. The first batch broke. The butter turned all grainy. I think the eggs were still too warm when the butter was added. I tried a second batch. This one looked fantastic, so this is where my mother (my assistant for the day), and I, took a break for lunch.
Sidenote: We found the most amazing Greek restaurant in my town. I want to get M there, since he has actually eaten real Greek food, you know, like from Greece, so he can be a judge.
Anywho... we get back and the fantastic looking batch of frosting is now soup. ARGH! Ok. Two batches gone, 14 eggs gone. Martha is no longer my hero. Time to try something else. We go back to a regular buttercream, tried and true. It's much sweeter than I had hoped for, but it worked.
The cake looked great when we were done. We did a texture design and it looked like a fluffy snowball. Super cute. Well, Sunday, party day, was about as humid as it can get without actually raining. I check the amazing cake, and half the frosting is sliding off the side. Fantabulous! Move it to the basement, since the fridge is full of party stuff, and hope for the best. I am so thankful for the texture technique, as it's so easy to fix.
In the end, the cake was a success. Thankfully the awesomness of the cake overrode the sweetness of the frosting.
Monday, August 8, 2011
Zucchini zucchini everywhere
It's that time of year, and although I only planted one, we still have managed to obtain a few of those greeen squash from well meaning family and friend farmers. Which means, I have to find something to do with all these things before they go bad. The real kicker, we aren't a vegetable house. Unless it's salad, we don't eat much for veggies. M and AJ love peas, and I'll eat cooked green beans, but that's it for cooked veggies. Hmmm, dilema dilema
So, how to solve this problem? BAKE!
Zucchini Brownies
from allrecipes
Ingredients
I skipped the frosting. I didn't drain the zucchini, or add nuts and it came out very moist and cake like. Quite tasty
Chocolate Chip Zucchini Bread
from Paula Deen
In a large bowl, beat eggs until light and fluffy. Add sugar, and continue beating until well blended. Stir in oil, vanilla, zucchini, pecans, chocolate chips, and orange zest. Stir in sifted ingredients. Pour into prepared loaf pans.
Bake for 50 minutes, or until a skewer inserted in the middle comes out clean. Remove loaves from pans and cool. Chill before slicing.
I added walnuts because that's what I had on hand and skipped her suggestions for garnish and the orange zest since we didn't have any. I also used a full bag (12 oz) of chocolate chips. Why leave those sad 4 oz in the bag? A little extra chocolate has never been complained of in this house.
And because I felt bad about baking and not having anything relatively healthy
Oven Fried Zucchini Chips
from Cinnamon Spice & Everything Nice
1. Preheat oven to 425° F. Grease a large oven-proof wire rack set on a baking sheet.
2. Whisk together bread crumbs, Parmesan, salt, onion powder and pepper in a medium bowl. Place milk in a separate shallow bowl. Dip zucchini slices in milk then in breadcrumb mixture patting the crumbs on. Place slices on wire rack. Repeat until all are coated.
3. Bake for 30 minutes or until golden brown. Serve immediately with basil dipping sauce if desired.
I made a dipping sauce based loosely on what I saw there, but didn't have many of the ingredients listed, so I just used sour cream, mayo and dried Italian Seasoning. Not amazing, but enough.
So, how to solve this problem? BAKE!
Zucchini Brownies
from allrecipes
Ingredients
- 1/2 cup vegetable oil
- 1 1/2 cups white sugar
- 2 teaspoons vanilla extract
- 2 cups all-purpose flour
- 1/2 cup unsweetened cocoa powder
- 1 1/2 teaspoons baking soda
- 1 teaspoon salt
- 2 cups shredded zucchini
- 1/2 cup chopped walnuts
- 6 tablespoons unsweetened cocoa powder
- 1/4 cup margarine
- 2 cups confectioners' sugar
- 1/4 cup milk
- 1/2 teaspoon vanilla extract
Directions
- Preheat oven to 350 degrees F (175 degrees C). Grease and flour a 9x13 inch baking pan.
- In a large bowl, mix together the oil, sugar and 2 teaspoons vanilla until well blended. Combine the flour, 1/2 cup cocoa, baking soda and salt; stir into the sugar mixture. Fold in the zucchini and walnuts. Spread evenly into the prepared pan.
- Bake for 25 to 30 minutes in the preheated oven, until brownies spring back when gently touched. To make the frosting, melt together the 6 tablespoons of cocoa and margarine; set aside to cool. In a medium bowl, blend together the confectioners' sugar, milk and 1/2 teaspoon vanilla. Stir in the cocoa mixture. Spread over cooled brownies before cutting into squares.
I skipped the frosting. I didn't drain the zucchini, or add nuts and it came out very moist and cake like. Quite tasty
Chocolate Chip Zucchini Bread
from Paula Deen
Ingredients
- 3 cups all-purpose flour
- 1/2 teaspoon baking powder
- 1 teaspoon salt
- 1/2 teaspoon ground cinnamon
- 1/2 teaspoon ground nutmeg
- 1 teaspoon baking soda
- 3 eggs
- 2 cups white sugar
- 1 cup vegetable oil
- 2 teaspoons vanilla extract
- 2 cups grated zucchini
- 1 cup chopped pecans
- 1 cup semisweet chocolate chips
- 1 tablespoon orange zest
- Whipped cream, for serving
- Zucchini ribbons, for serving
Directions
Preheat oven at 350 degrees F. Grease (2) 9 by 5-inch loaf pans.
Sift together flour, baking powder, salt, spices and baking soda.In a large bowl, beat eggs until light and fluffy. Add sugar, and continue beating until well blended. Stir in oil, vanilla, zucchini, pecans, chocolate chips, and orange zest. Stir in sifted ingredients. Pour into prepared loaf pans.
Bake for 50 minutes, or until a skewer inserted in the middle comes out clean. Remove loaves from pans and cool. Chill before slicing.
I added walnuts because that's what I had on hand and skipped her suggestions for garnish and the orange zest since we didn't have any. I also used a full bag (12 oz) of chocolate chips. Why leave those sad 4 oz in the bag? A little extra chocolate has never been complained of in this house.
And because I felt bad about baking and not having anything relatively healthy
Oven Fried Zucchini Chips
from Cinnamon Spice & Everything Nice
Oven-Fried Parmesan Zucchini Chips
(adapted from Cooking Light)
1 cup seasoned breadcrumbs
1/2 cup Parmesan cheese, fresh grated
1/2 teaspoon salt
1/2 teaspoon onion powder
1/8 teaspoon freshly ground black pepper
1/3 cup milk
2 small zucchini cut in 1/4-inch-thick slices
Cooking spray or vegetable/olive oil
1. Preheat oven to 425° F. Grease a large oven-proof wire rack set on a baking sheet.
2. Whisk together bread crumbs, Parmesan, salt, onion powder and pepper in a medium bowl. Place milk in a separate shallow bowl. Dip zucchini slices in milk then in breadcrumb mixture patting the crumbs on. Place slices on wire rack. Repeat until all are coated.
3. Bake for 30 minutes or until golden brown. Serve immediately with basil dipping sauce if desired.
I made a dipping sauce based loosely on what I saw there, but didn't have many of the ingredients listed, so I just used sour cream, mayo and dried Italian Seasoning. Not amazing, but enough.
Wednesday, June 22, 2011
Food Fun Part 2
So, Sunday was Father's Day. I asked M earlier in the week what he would like for a meal. Since we had plans for the evening, that left breakfast. He said "well, I have an idea, but I know you'd never make it". Okay, now I knew this was one of two things, either sausage gravy and biscuits or SOS. Both of which make my stomach turn just watching him eat, let alone thinking of eating it myself. Anyway, he (thankfully) goes with the gravy and biscuits. I can deal with that, I think. Off to the internet to figure out how to make such things as I have never in my life made biscuits or white gravy.
Saturday night we were vising with M's family and M mentions what I'm making for him for Father's Day. Everyone is really excited and the invite themselves over for breakfast. Ummm fantastic. Okay, so now I need to hit up the grocery store when they open at 7AM, pick up what I need for the extra 6-9 people who will be showing up, then get home and attempt a first ever meal with an audience. Joy.
Well, I figured, biscuits = southern; southern = Paula Deen; so Paula Deen biscuit recipe should = perfection. Ah, no. I'm not sure where the error occurred, but I'm fairly positive that if I had attempted to make these biscuits anywhere south of Virginia I would be tarred, feathered and catapulted back to New England. They weren't hockey pucks, but they sure weren't fluffy Cracker Barrell goodness either. Guess I need a lot more work on biscuit making should we ever get the urge to move south. Thankfully no one complained, they just added more gravy.
I found a recipe for sausage gravy and the picture looked similar to what I remember M being served when we'd go out for breakfast, at least before I put my menu up to block the sight of him actually eating the stuff. I was amazed at how easy it was. The only issue I had was at the end when I needed to know if the seasoning was correct. I had to enlist M's help to taste test. I don't know what the taste is supposed to be, and even knowing the ingredients, I still couldn't bring myself to actually taste that stuff.
So, one good one bad, but here are the recipes I used for M's big meal. Not sure if I'll be getting a second request for this one though.
Paula Deen's Biscuits (from foodnetwork.com) I should have known there would be an issue when no cook temp was set. Online reviews gave me an idea.
Butter bottom of skillet and place biscuits in pan. Bake for 12 minutes or until golden brown.
Super Sausage Gravy from Allrecipes/Bob Evans
Ingredients
Saturday night we were vising with M's family and M mentions what I'm making for him for Father's Day. Everyone is really excited and the invite themselves over for breakfast. Ummm fantastic. Okay, so now I need to hit up the grocery store when they open at 7AM, pick up what I need for the extra 6-9 people who will be showing up, then get home and attempt a first ever meal with an audience. Joy.
Well, I figured, biscuits = southern; southern = Paula Deen; so Paula Deen biscuit recipe should = perfection. Ah, no. I'm not sure where the error occurred, but I'm fairly positive that if I had attempted to make these biscuits anywhere south of Virginia I would be tarred, feathered and catapulted back to New England. They weren't hockey pucks, but they sure weren't fluffy Cracker Barrell goodness either. Guess I need a lot more work on biscuit making should we ever get the urge to move south. Thankfully no one complained, they just added more gravy.
I found a recipe for sausage gravy and the picture looked similar to what I remember M being served when we'd go out for breakfast, at least before I put my menu up to block the sight of him actually eating the stuff. I was amazed at how easy it was. The only issue I had was at the end when I needed to know if the seasoning was correct. I had to enlist M's help to taste test. I don't know what the taste is supposed to be, and even knowing the ingredients, I still couldn't bring myself to actually taste that stuff.
So, one good one bad, but here are the recipes I used for M's big meal. Not sure if I'll be getting a second request for this one though.
Paula Deen's Biscuits (from foodnetwork.com) I should have known there would be an issue when no cook temp was set. Online reviews gave me an idea.
Ingredients
- 2 cups all-purpose flour
- 1 teaspoons sugar
- 1 tablespoon baking powder
- 1 teaspoon salt
- 8 tablespoons butter, cubed
- 3/4 cup milk
Directions
In a large bowl combine flour, sugar, baking powder and salt together. Cut butter into mixture until it begins to look like cornmeal.
Make a well with flour mixture and slowly add milk into the middle. Knead dough with your fingers and add milk when necessary. Roll out dough onto a lightly floured surface and roll out to desired thickness. Cut with small biscuit cutter.Butter bottom of skillet and place biscuits in pan. Bake for 12 minutes or until golden brown.
Super Sausage Gravy from Allrecipes/Bob Evans
Ingredients
- 1 pound Bob Evans® Original Recipe Sausage Roll
- 1/4 cup all-purpose flour
- 2 cups milk
- Salt and black pepper to taste
- 8 prepared biscuits
Directions
- Crumble and cook sausage in large skillet over medium heat until browned. Stir in flour until dissolved. Gradually stir in milk. Cook gravy until thick and bubbly. Season with salt and pepper. Serve hot over biscuits. Refrigerate leftovers.
Tuesday, June 21, 2011
Food Fun Part 1
I've been slacking on updating here lately. I have been having some fun in the kitchen, but sadly my camera was no where near me at the time. I was trying some new creations for me, and didn't really want to document the possible failure. So what have I been up to?
First: Canning! I have never canned anything, however I grew up on self-preserved foods as we lived on a huge farm and my mother would have to put foods away from the garden and could only make it to the store maybe monthly. So, after reading lots of blog posts from one of my new faves/and old friends Yankee Hoosier Momma, I got inspired to finally give it a try. I had 12 peaches that were about to turn and no interest in eating them at the time. So, of course I go to the internet and see how many peaches I need to make preserves. Lo and behold I find recipes calling for 12 peaches. Awesome!
I take AJ out to Walmart to see what is needed for canning and what the prices will be. Of course this means I come home with all the equipment. M knew I wasn't actually going to look at that stuff and then leave. Now to show just how not with it I am, I look at the water bath canner pot and think, "hey, that looks just like a lobster pot". Um, yeah, I had always seen lobsters being cooked in that pot, so I completely thought that was a lobster pot. My mother had to explain to me the difference later that day. My bad. I get another vote of confidence when while checking out the cashier says "I always wanted to know how to make jelly", and I respond with "I'm hoping to learn today". She stares at me dumbfounded "you're going to teach yourself?" "Yep :)". Hey, isn't that what the internet is for?
So, back to home, and looking up lots of recipes to figure out where to start. First I have to find out how to start prepping. I get that done, and I'm off. It was surprisingly easy, which was great for a first attempt. I made 8 jelly jars and they all sealed without an issue. Yay me! It tastes very peachy and I'm really excited to attempt to make more jelly/jam/preserves and then as the season moves on, I'm on to pickling and relishes. Woot!
So, anyway, here's the recipe for the peach preserves I made, however I used less sugar, only 5 1/2 cups.
First: Canning! I have never canned anything, however I grew up on self-preserved foods as we lived on a huge farm and my mother would have to put foods away from the garden and could only make it to the store maybe monthly. So, after reading lots of blog posts from one of my new faves/and old friends Yankee Hoosier Momma, I got inspired to finally give it a try. I had 12 peaches that were about to turn and no interest in eating them at the time. So, of course I go to the internet and see how many peaches I need to make preserves. Lo and behold I find recipes calling for 12 peaches. Awesome!
I take AJ out to Walmart to see what is needed for canning and what the prices will be. Of course this means I come home with all the equipment. M knew I wasn't actually going to look at that stuff and then leave. Now to show just how not with it I am, I look at the water bath canner pot and think, "hey, that looks just like a lobster pot". Um, yeah, I had always seen lobsters being cooked in that pot, so I completely thought that was a lobster pot. My mother had to explain to me the difference later that day. My bad. I get another vote of confidence when while checking out the cashier says "I always wanted to know how to make jelly", and I respond with "I'm hoping to learn today". She stares at me dumbfounded "you're going to teach yourself?" "Yep :)". Hey, isn't that what the internet is for?
So, back to home, and looking up lots of recipes to figure out where to start. First I have to find out how to start prepping. I get that done, and I'm off. It was surprisingly easy, which was great for a first attempt. I made 8 jelly jars and they all sealed without an issue. Yay me! It tastes very peachy and I'm really excited to attempt to make more jelly/jam/preserves and then as the season moves on, I'm on to pickling and relishes. Woot!
So, anyway, here's the recipe for the peach preserves I made, however I used less sugar, only 5 1/2 cups.
| Peach Preserves | |
| Ingredients: Amount Measure Ingredient -- Preparation Method Cooking Directions:
|
Tuesday, April 5, 2011
Jambalaya
I recently read a blog post from Morrigan about a jambalaya recipe. It looked so yummy, I just had to try it. Of course I had to also change it quite a bit, because that's what I do. Actually I just didn't read the whole recipe before going shopping, so I had to make substitutions in quite a few places.
So, this is closer to what I did:
2 tablespoons olive oil
1 1/2 pounds boneless skinless chicken thighs, cleaned and cut up into large bite sized pieces
Kosher salt and freshly ground black pepper
1 pound smoked sausage, sliced into circles - I used turkey kielbasa
1 bag of frozen chopped pepper and onion for stir fry
A few shakes of the Adobo spice jar
A bit of dried thyme
2 cups brown basmati rice - this I wouldn't do again, the rice was still crunchy after cooking
3 tablespoons tomato paste
1 (14-ounce) can fire-roasted diced tomatoes - I had a 28oz can of whole tomatoes, so I drained half the juice and chopped them up in the pot
2 1/2 cups chicken broth
1 dried bay leaf
Shrimp, about 1/2 pound, deveined, shelled, etc - I had a bag of frozen pre-cooked, so I dumped that in towards the end just to thaw and heat through
A good shake of Mrs. Dash Chipotle seasoning - less heat for AJ
sprinkle of cayenne pepper - I put this directly in M and my bowls, again, so AJ could eat it
1/4 cup thinly sliced green onions
3 tablespoons chopped fresh parsley
I also added a good shake of celery salt and lessened the actual salt.
Directions
Heat the oil in a large Dutch oven over medium-high heat.
Season the chicken with salt and pepper. Add chicken to the Dutch oven and brown on each side, about 8 minutes total. Remove to a plate and reserve.
Add sausage, onion, bell pepper, Adobo, and thyme and saute until translucent and sausage is browned, about 8 minutes. (you may want to brown sausages seperately like chicken)
Stir in rice, tomato paste, canned tomatoes, broth, bay leaf, and reserved chicken, and bring to a boil, then reduce to a simmer, and cook on low, covered, for 20 minutes. Add the chipotle seasoning.
Last 10ish minutes, add the shrimp, once the rice is almost done since the shrimp does not take long to cook.
Turn off heat and let rice stand, covered, 5 minutes. Remove bay leaf. Fluff rice with fork and stir in green onions
There was no rice fluffing to be done with mine. Like I said, it was still crunchy at the end. I'm hoping the leftovers will be a little more al dente at least. I'll definitely make this again, this time when I have garlic in the house and some better rice.
So, this is closer to what I did:
2 tablespoons olive oil
1 1/2 pounds boneless skinless chicken thighs, cleaned and cut up into large bite sized pieces
Kosher salt and freshly ground black pepper
1 pound smoked sausage, sliced into circles - I used turkey kielbasa
1 bag of frozen chopped pepper and onion for stir fry
A few shakes of the Adobo spice jar
A bit of dried thyme
2 cups brown basmati rice - this I wouldn't do again, the rice was still crunchy after cooking
3 tablespoons tomato paste
1 (14-ounce) can fire-roasted diced tomatoes - I had a 28oz can of whole tomatoes, so I drained half the juice and chopped them up in the pot
2 1/2 cups chicken broth
1 dried bay leaf
Shrimp, about 1/2 pound, deveined, shelled, etc - I had a bag of frozen pre-cooked, so I dumped that in towards the end just to thaw and heat through
A good shake of Mrs. Dash Chipotle seasoning - less heat for AJ
sprinkle of cayenne pepper - I put this directly in M and my bowls, again, so AJ could eat it
1/4 cup thinly sliced green onions
3 tablespoons chopped fresh parsley
I also added a good shake of celery salt and lessened the actual salt.
Directions
Heat the oil in a large Dutch oven over medium-high heat.
Season the chicken with salt and pepper. Add chicken to the Dutch oven and brown on each side, about 8 minutes total. Remove to a plate and reserve.
Add sausage, onion, bell pepper, Adobo, and thyme and saute until translucent and sausage is browned, about 8 minutes. (you may want to brown sausages seperately like chicken)
Stir in rice, tomato paste, canned tomatoes, broth, bay leaf, and reserved chicken, and bring to a boil, then reduce to a simmer, and cook on low, covered, for 20 minutes. Add the chipotle seasoning.
Last 10ish minutes, add the shrimp, once the rice is almost done since the shrimp does not take long to cook.
Turn off heat and let rice stand, covered, 5 minutes. Remove bay leaf. Fluff rice with fork and stir in green onions
There was no rice fluffing to be done with mine. Like I said, it was still crunchy at the end. I'm hoping the leftovers will be a little more al dente at least. I'll definitely make this again, this time when I have garlic in the house and some better rice.
Monday, March 28, 2011
Granola

I got this recipe from Alton Brown at Food Network
- 3 cups rolled oats
- 1 cup slivered almonds
- 1 cup cashews
- 3/4 cup shredded sweet coconut
- 1/4 cup plus 2 tablespoons dark brown sugar
- 1/4 cup plus 2 tablespoons maple syrup
- 1/4 cup vegetable oil
- 3/4 teaspoon salt
- 1 cup raisins
Preheat oven to 250 degrees F.
In a large bowl, combine the oats, nuts, coconut, and brown sugar.
In a separate bowl, combine maple syrup, oil, and salt. Combine both mixtures and pour onto 2 sheet pans. Cook for 1 hour and 15 minutes, stirring every 15 minutes to achieve an even color.
Remove from oven and transfer into a large bowl. Add raisins and mix until evenly distributed.
I switched cashews for walnuts and chopped dried fruit mix for raisins. I actually loved it straight out of the oven without the fruit in it. It is so good.
In a large bowl, combine the oats, nuts, coconut, and brown sugar.
In a separate bowl, combine maple syrup, oil, and salt. Combine both mixtures and pour onto 2 sheet pans. Cook for 1 hour and 15 minutes, stirring every 15 minutes to achieve an even color.
Remove from oven and transfer into a large bowl. Add raisins and mix until evenly distributed.
I switched cashews for walnuts and chopped dried fruit mix for raisins. I actually loved it straight out of the oven without the fruit in it. It is so good.
Monday, February 7, 2011
Blueberry Cornmeal Muffins

Ingredients
1 1/4 cups all-purpose flour
1/2 cup cornmeal
1/2 cup brown sugar
1/2 teaspoon salt
1 tablespoon baking powder
1 cup milk
1/2 cup butter, melted
1 egg, beaten
1 cup frozen blueberries
Directions
1.Preheat oven to 375 degrees F (190 degrees C). Grease muffin cups or line with paper muffin liners.
2.Sift flour, cornmeal, brown sugar, salt and baking powder together into a large bowl. Dredge the blueberries in the sifted ingredients. In a small bowl, combine the milk, butter and egg. Stir the wet ingredients into the flour mixture just until moistened. Spoon batter into prepared muffin tins.
3.Bake in preheated oven for 20 minutes. Let muffins sit for 10 minutes before removing from the pan.
Makes 12 muffins
I baked them for 27 minutes, and they were very yummy.

Subscribe to:
Posts (Atom)